Few framing mistakes draw red ink from a building certifier faster than an over-cut rafter. When pitching a roof on site, carving too deep into the underside of a timber rafter directly weakens the structural cross-section where shear stress and vertical bearing loads peak.
Cut past the allowable limit, and that 140mm rafter effectively behaves like a 90mm stick under heavy tile loads. Left unchecked, over-notching creates dangerous stress risers that cause split rafter tails, sagging eaves, and failed pre-sheet frame inspections.
This guide breaks down the mandatory AS 1684.2:2021 limits on birdsmouth cut depth, how to measure and mark the cut accurately on your speed square, worked examples for common Australian timber sizes, and the critical structural traps to avoid.
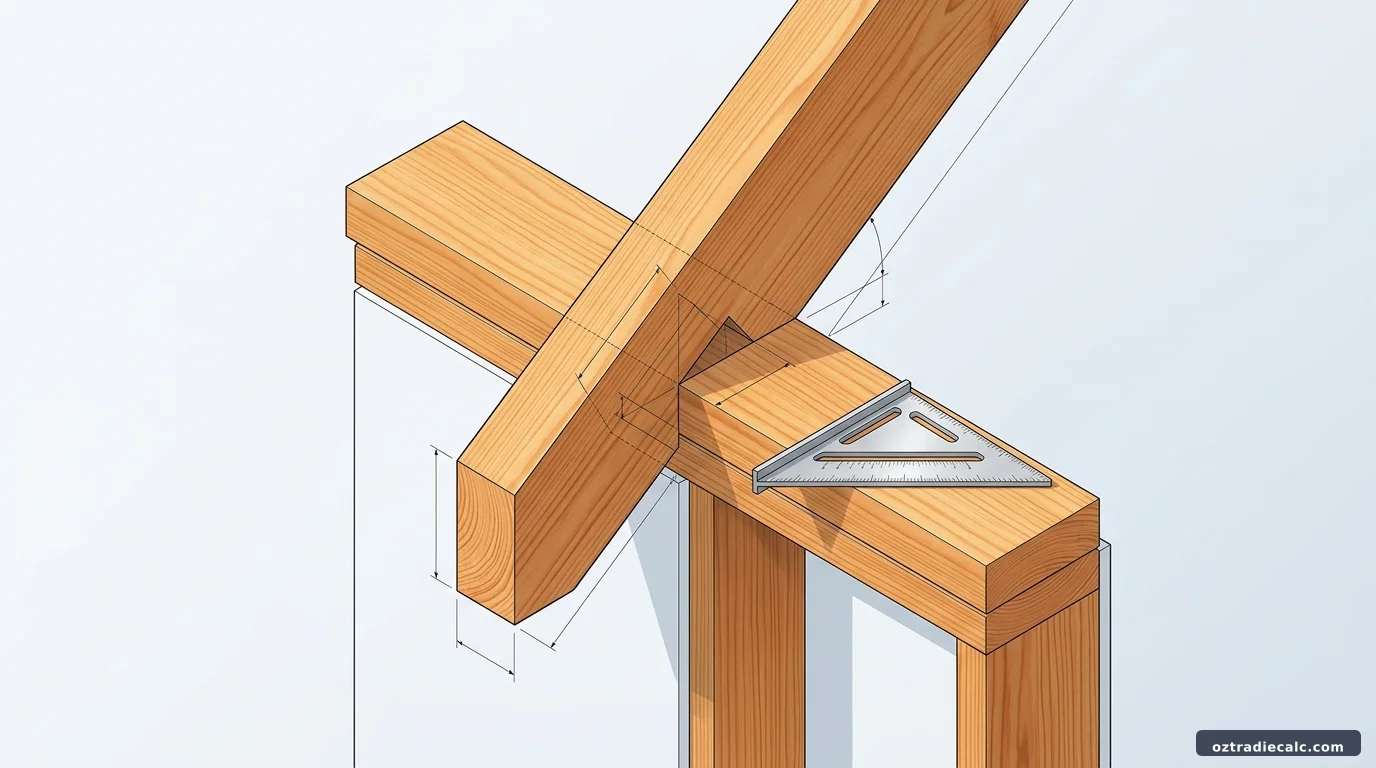
AS 1684.2 Golden Rule: Under AS 1684.2:2021, the maximum depth of a birdsmouth cut must not exceed one-third (1/3) of the rafter depth. At least two-thirds (2/3) of the original timber depth must remain unbroken above the cut.
What Is a Birdsmouth Cut?
A birdsmouth is an angled notch cut into the underside of a roof rafter where it seats onto the top plate of an external wall framing frame. It provides a flat, level bearing surface that transfers roof dead and live loads safely down into the wall studs.
Every birdsmouth consists of two distinct cut lines meeting at a 90-degree internal angle:
- The Seat Cut (Level Cut): The horizontal cut that rests directly flat across the top plate.
- The Plumb Cut (Heel Cut): The vertical cut that runs parallel to the face of the wall frame.
Birdsmouth Cut Depth Under AS 1684
In Australia, residential timber roof framing is governed by AS 1684.2:2021 (Non-Cyclonic) and AS 1684.3 (Cyclonic). Clause provisions for coupled and non-coupled pitched roofs strictly limit timber notches to protect structural integrity.
The building standard explicitly stipulates:
The table below outlines the maximum allowable birdsmouth cut depth across common Australian structural timber rafter dimensions (MGP10, F7, and F17):
| Nominal Rafter Size | Total Timber Depth (D) | One-Third Calculation | Max Allowable Cut Depth | Minimum Remaining Section |
|---|---|---|---|---|
| 90 × 45 mm | 90 mm | 90mm ÷ 3 | 30.0 mm | 60.0 mm |
| 120 × 45 mm | 120 mm | 120mm ÷ 3 | 40.0 mm | 80.0 mm |
| 140 × 45 mm | 140 mm | 140mm ÷ 3 | 46.6 mm (~46 mm) | 93.4 mm |
| 190 × 45 mm | 190 mm | 190mm ÷ 3 | 63.3 mm (~63 mm) | 126.7 mm |
| 240 × 45 mm | 240 mm | 240mm ÷ 3 | 80.0 mm | 160.0 mm |
| 290 × 45 mm | 290 mm | 290mm ÷ 3 | 96.6 mm (~96 mm) | 193.4 mm |
How to Measure Birdsmouth Depth
A frequent point of confusion on site is where to measure the cut. The depth must be measured as the true vertical plumb depth of the notch, not along an arbitrary angle.
Follow this five-step sequence when marking your pattern rafter:
- Identify Total Rafter Depth: Measure the actual milled width of your timber with a tape measure. A dressed 140×45 stick is usually true 140mm, but rough-sawn hardwood or seasoned pine can vary by 2–3mm.
- Calculate the One-Third Maximum: Divide the actual depth by 3. For 140mm timber, your maximum allowable vertical cut depth is exactly 46.6mm.
- Mark the Plumb Cut Line: Using a speed square set to your roof pitch (e.g. 22.5°), scribe your plumb line on the rafter. Measure up from the bottom edge along this line and mark your maximum depth (e.g. 46mm).
- Scribe the Level Seat Cut: Rotate the square 90 degrees to scribe the seat cut intersecting your depth mark. Confirm that the seat cut length does not overhang the inside face of the top plate.
- Check the Remaining Section: Measure perpendicular to the top edge above the heel notch. Confirm that at least 2/3 of the timber body remains intact before cutting with a circular saw and handsaw.
Birdsmouth Cut Examples
Here are three practical examples across common Australian roof construction types:
Example 1: Shallow Rafter (90 × 45 mm)
Common on small verandahs, carports, and residential skillion roof additions.
- Rafter Depth: 90 mm
- Calculation: 90 ÷ 3 = 30.0 mm
- Max Vertical Cut: 30 mm
- Remaining Structural Section: 60 mm
Example 2: Medium Rafter (140 × 45 mm)
Standard stick-built pitched roofs with corrugated steel (Colorbond) sheeting.
- Rafter Depth: 140 mm
- Calculation: 140 ÷ 3 = 46.6 mm
- Max Vertical Cut: 46 mm
- Remaining Structural Section: 94 mm
Example 3: Large Rafter (190 × 45 mm)
Heavy concrete tile roofs, cathedral raked ceilings, or long-span rafters.
- Rafter Depth: 190 mm
- Calculation: 190 ÷ 3 = 63.3 mm
- Max Vertical Cut: 63 mm
- Remaining Structural Section: 127 mm
Why the Birdsmouth Cut Depth Matters
Roof rafters operate under complex structural forces. The top edge is in compression, while the bottom edge is in tension.
Cutting a notch out of the bottom edge creates a sharp re-entrant corner (an internal 90-degree angle). In structural engineering, this is known as a notch stress concentration. If the cut is too deep:
Loss of Bending Strength
Bending strength is proportional to the square of timber depth ($D^2$). Cutting 50% through a rafter cuts its load-carrying bending resistance by over 75%, leading to sudden roof deflection and sagging.
Horizontal Shear Cracking
Shear stress peaks right above the wall plate support. An excessive notch encourages timber grain to split horizontally from the birdsmouth corner all the way out to the eaves tail.
Inadequate Bearing Area
The seat cut must bear fully across the wall top plate to distribute weight without crushing the timber fibres of the pine wall plate underneath.
Rafter Tail Sagging
The rafter tail supports fascia, gutters, and rainwater weight. Over-cutting leaves the overhang weakly cantilevered, causing sagging eaves lines over time.
Birdsmouth Cut: Common Mistakes
Site carpenters and certifiers frequently run into these five mistakes when inspecting cut rafters:
- Cutting Past the 1/3 Limit: Notching more than one-third of the depth. This automatically invalidates the AS 1684 span tables, requiring structural engineering certification or rafter doubling.
- Over-Cutting with a Circular Saw: Letting the circular saw blade run past the corner on the bottom face. This over-cut slices into the remaining structural timber, forming an instant crack line. Always stop short and finish the cut neatly with a handsaw.
- Birdsmouth Overhanging the Wall Inside: Letting the seat cut extend beyond the inside edge of the top plate. The plumb cut must sit flush or external to the plate face—never protruding inside the room cavity.
- Measuring on the Wrong Axis: Measuring depth diagonally along the timber face rather than checking the vertical plumb depth.
- Assuming One Notch Depth Fits Every Pitch: Steeper roofs (e.g. 35°) produce longer plumb cuts than shallow roofs (e.g. 15°) for the exact same seat cut length. Always calculate both cuts individually for your specific pitch.
AS 1684 Birdsmouth vs Rafter Size
You cannot evaluate birdsmouth cuts in isolation from overall rafter sizing.
The span tables in AS 1684.2 Supplements assume that the full structural rafter depth is intact throughout the span, with only the prescribed maximum 1/3 notch at the support point. If your site conditions require a deeper notch, the effective depth is reduced, and the rafter can no longer achieve its tabulated span.
Rafter sizing is influenced by:
- Roof Covering Mass: Heavy tiles (~60 kg/m²) vs light sheet steel (~10 kg/m²).
- Rafter Spacing: 450mm centres vs 600mm or 900mm centres.
- Wind Classification: N1/N2 non-cyclonic up to C1/C2 cyclonic tie-down forces.
Before cutting your rafters, verify your maximum allowable span using our Timber Span Calculator or calculate pitch angles with the Roof Pitch & Rafter Calculator.
Can You Cut a Rafter Deeper Than One Third?
The short answer under standard Australian building regulations is no.
Under the deemed-to-satisfy provisions of AS 1684 and the National Construction Code (NCC), any birdsmouth cut exceeding one-third of the member depth is considered non-compliant. Building certifiers will not sign off on the roof frame during pre-lining inspections.
If an existing rafter has accidentally been over-cut on site, the situation must be rectified using one of three compliant solutions:
- Sistering / Doubling the Rafter: Clamping and bolting an identical timber member alongside the over-cut rafter to restore full structural cross-section.
- Engineered Metal Framing Brackets: Installing certified steel rafter tie brackets or heavy framing anchors approved by an engineer to bypass the notched stress point.
- Replacement: Removing the damaged rafter and cutting a fresh stick to the correct AS 1684 geometry.
Birdsmouth Cut Summary & Best Practice
To guarantee your roof frame passes inspection on the first visit:
Chippie Site Best Practices:
- Always divide by 3: Keep vertical notch depth under 33% of the total rafter depth.
- Maintain full plate bearing: Seat cuts must rest securely across the top plate without internal overhang.
- Finish cuts by hand: Never over-cut the internal corner with a circular saw blade.
- Install compliant tie-downs: Secure rafters to wall plates using framing anchors, triple grips, or cyclone ties rated for your site's wind classification.
Accurate rafter cutting is the hallmark of skilled carpentry. By keeping your birdsmouth notch strictly within the AS 1684 one-third depth limit, you protect the structural integrity of the roof, maintain proper top plate bearing, and avoid costly defect notices during certifier inspections.
Always check your timber stress grade, refer to the correct AS 1684.2 span supplement for your roof covering, and consult a structural engineer if non-standard roof geometries require custom detailing.