Every weekend across Australia, someone picks up a shovel, buys a coil of cable from an electrical wholesaler or online supplier, and prepares to trench power out to their backyard shed. The question almost everyone asks in trade forums or over the counter is simple: "Can I just pull a 2.5mm² or 6mm² cable out there?"
Cable selection for an outbuilding is never a one-size-fits-all decision where "it's just a shed, so use X mm²". A cable that works perfectly for two LED batten lights in a garden shed will cause lights to flicker, welders to stall, and circuit breakers to trip the moment you plug in a 15A compressor thirty metres down the yard.
Under Australian standards, picking the wrong cable size doesn't just mean poor tool performance—it can lead to hazardous overheating inside underground conduit, premature insulation failure, and an immediate red tag from an electrical inspector during a Certificate of Electrical Safety (COES) sign-off.
What Determines the Cable Size for a Shed?
In Australia, selecting the correct conductor size for any sub-main or final circuit is strictly governed by AS/NZS 3000:2018 (the Wiring Rules) and the detailed calculation methods set out in AS/NZS 3008.1.1 (referenced in updated 2025/2026 electrical licensing assessments, including Energy Safe Victoria and state regulators).
Instead of guessing a diameter, a licensed sparkie evaluates seven interrelated site factors before unrolling a single metre of copper:
| Key Factor | Site Reality | Why It Dictates Cable Selection |
|---|---|---|
| Total Electrical Load | What machinery, lighting, and power outlets will run at the same time? | Sets the minimum continuous current-carrying capacity (Amps) the copper core must carry without overheating. |
| Distance from Main Switchboard | Total route length through roof spaces, down external walls, and through the trench. | Longer distances generate electrical resistance, causing supply voltage to drop before reaching your tools. |
| Allowable Voltage Drop | Strict statutory 5% total limit under AS/NZS 3000 Clause 3.8.4. | Forces you to step up the cable cross-section (e.g. from 4mm² to 10mm²) even if the smaller cable could carry the amps. |
| Installation Method | Underground heavy-duty PVC conduit, clipped to masonry, or aerial catenary wire. | Thermal insulation and surrounding soil limit how fast heat escapes, directly derating the cable's amp rating. |
| Cable Insulation Type | Standard V-90 PVC building wire vs XLPE (X-90) insulated cables. | XLPE tolerates higher operating temperatures (90°C continuous), allowing higher amp ratings per millimetre. |
| Upstream Protective Device | Circuit breaker or RCBO rating in the main house switchboard (e.g. 25A, 32A, 40A, 50A). | The cable's thermal rating ($I_z$) must always be equal to or higher than the breaker rating ($I_n$) under fault conditions. |
| Future Load Allowances | Planning for an EV charger, split system air con, or vehicle hoist in two years. | Retrenching a finished concrete driveway or manicured lawn costs three times more than running a larger cable on day one. |
Common Shed Electrical Setups
Backyard sheds across Australia broadly fall into three categories. In each scenario, the relationship between connected equipment, cable route distance, and required conductor cross-section changes significantly:
Small Garden Shed
Storage, garden maintenance, and battery tool charging.
- Typical Load: 1x 20W LED batten, battery chargers, radio (under 5A total draw).
- Distance: 10m to 20m from main board.
- Supply Arrangement: Often fed as an extension of a 16A or 20A domestic power sub-circuit.
- Typical Cable: 2.5mm² TPS (if run under 18m) or 4mm² in heavy-duty conduit.
Dedicated Workshop Shed
Woodworking or metal fabrication with multiple power tools.
- Typical Load: Table saw, dust extractor, 15A air compressor, inverter MIG welder (20A to 32A peak draw).
- Distance: 20m to 40m through underground trench.
- Supply Arrangement: Dedicated 32A sub-main feeding a 4-pole shed sub-board.
- Typical Cable: 6mm² (short runs) or 10mm² copper 2C+E / Orange Circular.
Large Multi-Purpose / Studio
Heavy automotive gear, home office studio, or future granny flat.
- Typical Load: 5.0kW split system AC, 2-post car hoist, 7kW EV charger, electric water heater (40A to 63A).
- Distance: 30m to 60m+ across acreage or large suburban block.
- Supply Arrangement: Dedicated 40A–63A single-phase or 32A three-phase sub-main.
- Typical Cable: 10mm² to 16mm² copper (or 25mm² XLPE Aluminium).
| Shed Scenario | Continuous Design Load | Trench Run Length | Upstream Breaker | Recommended Cable Size | Expected Sub-Main Voltage Drop |
|---|---|---|---|---|---|
| Garden Shed (Lights + 1 GPO) | 10 Amps | 15 metres | 16A MCB | 2.5 mm² | ~1.1% (Compliant) |
| Garden Shed (Long Yard) | 10 Amps | 35 metres | 16A MCB | 4.0 mm² | ~1.6% (Compliant) |
| Chippy Workshop (Small) | 25 Amps | 20 metres | 25A MCB | 6.0 mm² | ~1.4% (Compliant) |
| Standard Tradie Workshop | 32 Amps | 35 metres | 32A MCB | 10.0 mm² | ~1.7% (Best Practice) |
| Acreage Workshop (Heavy Tools) | 32 Amps | 55 metres | 32A MCB | 16.0 mm² | ~1.7% (Required for Volt Drop) |
| Studio / Hoist / EV Ready | 50 Amps | 40 metres | 50A MCB | 16.0 mm² | ~2.3% (Compliant) |
How to Work Out the Right Cable Size
Shed cable sizing follows a systematic seven-step check under AS/NZS 3008.1.1. Skipping any step risks nuisance trips, stalled tools, or failing your electrical audit.
Determine Maximum Expected Load
Add up your concurrent loads: lighting, general GPOs, and heavy dedicated machinery. Apply load diversity under AS/NZS 3000 Table C1, since not every outlet runs at peak draw at the same time.
Tradie baseline: A workshop running a table saw and dust extractor concurrently typically requires a 25A to 32A design demand.
Measure the Full Cable Route
Never just pace out the lawn. Measure from the house switchboard, through the roof or subfloor, down external walls, through the trench, and up into the shed board.
Always add 10% extra (or 2–3 metres) for sweeping conduit bends, slack, and termination tails.
Determine the Installation Method
Most domestic shed runs use Method 3 (Enclosed in Underground Conduit). Under AS/NZS 3008 Table 27(1), suburban soil has an assumed ambient reference temperature of 25°C.
Check Current-Carrying Capacity ($I_z$)
Check the un-derated ampacity in AS/NZS 3008 Table 4 for your candidate cable. Remember to apply derating factors if the cable passes through ceiling or wall insulation batts before entering the trench.
Check Voltage Drop Compliance
Calculate the millivolt drop over your full route. If the sub-main drops more than 2.5% to 3.0% (5.75V–6.9V), step up to the next conductor size immediately—even if the current rating passes.
Coordinate the Protective Device ($I_n$)
Select an upstream circuit breaker in the house switchboard to protect the cable. The core rule is:
For example, a 32A circuit breaker requires a cable that safely carries at least 32A in its installed environment.
Confirm Fault Loop Impedance and Earthing
Verify your earth conductor sizing under AS/NZS 3000 Table 5.1. In a dead short to the steel shed frame, the upstream breaker must disconnect within 0.4 seconds.
Why Cable Length Matters (Voltage Drop)
Voltage drop is the number one reason sparkies up-size shed cables. Every copper conductor has natural electrical resistance that saps voltage over distance.
Think of it like water pressure dropping at the end of a 50-metre garden hose. Over 30 to 60 metres, that resistance builds up fast—causing flickering lights, stalling motors, and hot cables.
The 5% Australian Voltage Drop Rule (AS/NZS 3000 Cl 3.8.4)
On a standard single-phase 230V installation, the total voltage drop from the street supply pillar to the furthest power point in your shed must not exceed 5% (11.5 Volts). Because the street mains and the house switchboard already consume around 1% to 2% of that allowance, best practice requires keeping the shed sub-main drop to no more than 2.5% to 3.0% (5.75V to 6.9V).
Worked Calculation Example: 32A Workshop at 35 Metres
To understand how this calculation works in practice, consider a standard backyard workshop setup:
- Design Current ($I$): 32 Amps (single-phase 230V)
- Total Route Length ($L$): 35 metres
- Installation: Heavy-duty rigid orange PVC conduit underground
The standard AS/NZS 3008 formula for single-phase voltage drop is:
Where $V_c$ is the millivolt drop per ampere-metre ($mV/A.m$) from AS/NZS 3008.1.1 Table 42.
Option 1: Testing 6.0 mm² Copper
For 6mm² copper at 75°C conductor operating temperature, Vc = 7.42 mV/A.m.
Vd = (35m × 32A × 7.42) / 1000 = 8.31 V
Percentage Drop = (8.31 / 230) × 100 = 3.61%
✘ Marginal / Risk of failure: When combined with existing house volt drop, total drop at shed power outlets will exceed the 5% statutory limit.
Option 2: Stepping Up to 10.0 mm² Copper
For 10mm² copper at 75°C operating temperature, Vc = 4.40 mV/A.m.
Vd = (35m × 32A × 4.40) / 1000 = 4.93 V
Percentage Drop = (4.93 / 230) × 100 = 2.14%
✔ Compliant & Safe: Keeps sub-main drop well under 2.5%, leaving ample headroom for final circuits inside the workshop.
Underground Cable vs Other Installation Methods
While overhead catenary wires were common on older properties, underground wiring is the standard installation method for residential outbuildings across Australia today. It protects the cable from UV damage, high summer winds, and falling tree branches.
However, underground installations are strictly governed by AS/NZS 3000:2018 Table 3.7. Cutting corners on trench depth or mechanical protection is an automatic defect notice during electrical certification.
| Location of Trench | Mandatory Minimum Burial Depth (Table 3.7) | Required Conduit Specification | Marker Tape Requirements |
|---|---|---|---|
| Under Garden Beds & Lawn | 500 mm | Category A Heavy-Duty Rigid Orange PVC (min 20mm or 25mm dia) | Orange warning tape at ~50% depth (min 150mm above conduit) |
| Under Residential Driveways | 600 mm | Category A Heavy-Duty Rigid Orange PVC | Mandatory marker tape placed at 300mm below finished surface |
| Under Continuous Concrete Slab | 300 mm (under min 75mm concrete) | Heavy-Duty or Medium-Duty PVC conduit | Not strictly required under slab, but recommended at entry point |
| Directly Buried (Armoured / Neutral Screen) | 500 mm (with mechanical cover) | Steel Wire Armoured (SWA) or Orange Circular with concrete slabs/strips | Continuous electrical marker tape 150mm above mechanical cover |
Mechanical Protection & Slab Entry Points
The most vulnerable part of an underground cable run is where it leaves the soil and enters the shed. Under AS/NZS 3000 Clause 3.3.2:
- Conduit Risers: Cables rising from the trench up external walls must be enclosed in heavy-duty rigid PVC or galvanised steel conduit up to at least 1.5 metres above ground level to protect against garden spade strikes and line trimmers (whipper snippers).
- Slab Penetrations: If entering through the concrete shed slab, a pre-cast conduit sweep elbow (minimum 100mm to 150mm radius) must be cast into the slab or pinned tightly to the footing to avoid sharp kinks that damage cable sheaths during pulling.
- Vermin & Weather Sealing: Conduit ends must be sealed with silicone or conduit duct seal putty to prevent condensation, water pooling, and mice from nesting inside the switchboard enclosure.
Do I Need a Separate Switchboard in the Shed?
If your shed only has one single light and one standard double GPO on a very short cable run, it can technically be wired as a single extended sub-circuit protected by an existing RCBO in the main house switchboard.
However, for any workshop, multi-circuit setup, or dedicated workspace, installing a local sub-board (distribution board) inside the shed is strongly recommended and practically essential.
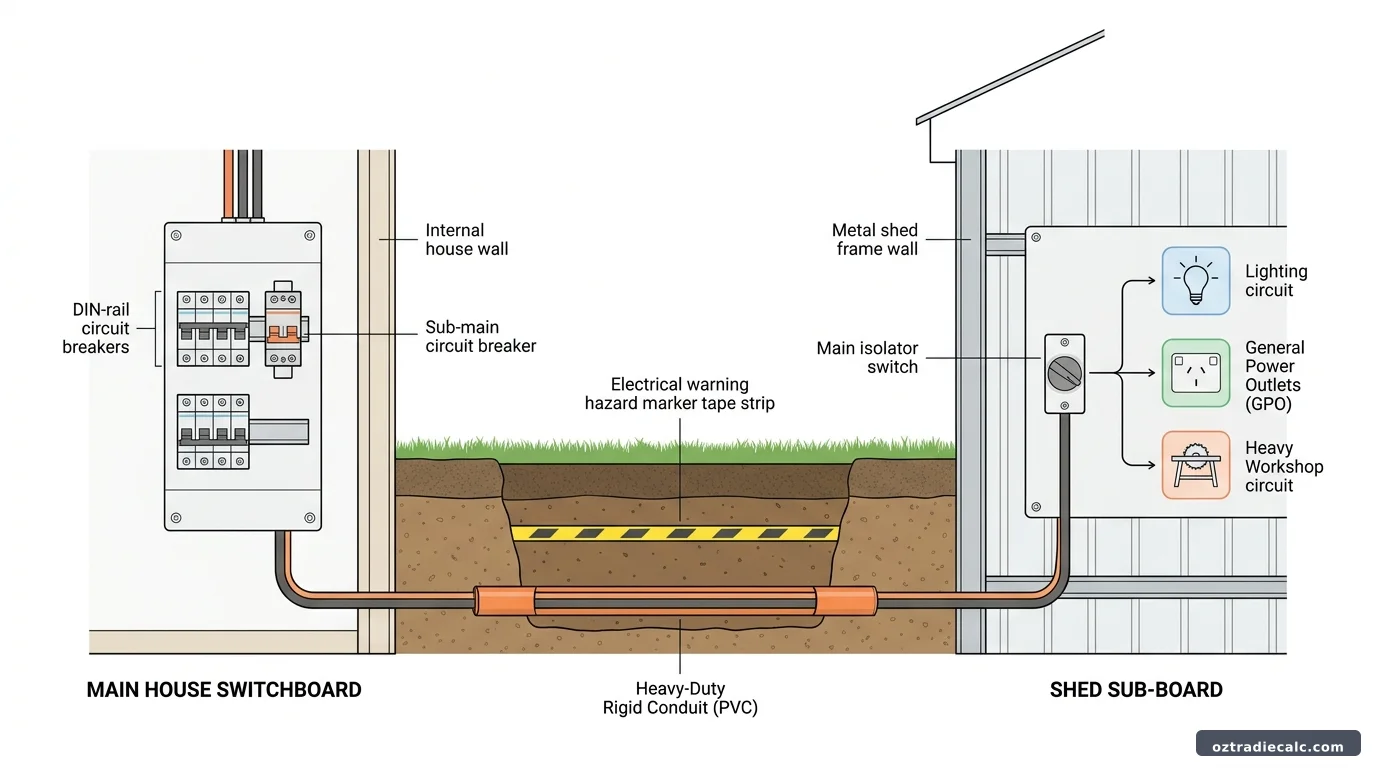
⚡ Standard Aussie Outbuilding Power Architecture
Why Local RCDs Matter for Tradies
When an old angle grinder or faulty moisture-exposed outdoor lead trips an RCD, having a local sub-board means only your workshop outlet trips. You reset it right next to your workbench in five seconds. Without a shed sub-board, an earth fault trips the main house safety switch, plunging the kitchen and living room into darkness and forcing you to trudge through the dark rain back to the house switchboard.
Outbuilding Earthing: Separate Stake vs Main Earth Conductor
Under AS/NZS 3000 Clause 5.5.3.1, outbuildings can be earthed in one of two ways:
- Continuous Protective Earth (Most Common): A dedicated earth wire running inside the sub-main cable connects the shed sub-board earth bar straight back to the main switchboard earth bar. No separate MEN link is installed in the shed.
- Separate MEN Outbuilding System: The shed is treated as an independent installation with its own driven copper-clad earth electrode (minimum 1.2m into soil under Clause 5.3.6.3) and an internal MEN link connecting neutral and earth bars inside the shed sub-board. This is common on large rural properties or runs exceeding 50 metres where fault loop impedance would otherwise be too high.
Practical Examples: Sizing Cables for Real Sheds
Here are three realistic site scenarios showing how an Australian electrician arrives at the final cable specification:
Example A: Suburban Backyard Storage Shed (Lights & Occasional Drill)
Calculation Check: 2.5mm² copper has an ampacity of ~22A in underground conduit (sufficient for 10A load). Over 22 metres at 10A, voltage drop is: (22 × 10 × 16.4) / 1000 = 3.60V = 1.57%.
✔ Compliant Cable: 2.5 mm² 2C+E TPS protected by a 16A Type C RCBO in the main board.
Example B: Woodworking & Metal Workshop (Table Saw, Compressor, Welder)
Calculation Check: 6mm² copper passes thermal current capacity (approx 41A in conduit), but causes a 3.6% voltage drop. Under motor inrush (starting a 15A compressor), voltage will dip below 205V, dimming lights and stalling the motor. Stepping up to 10mm² reduces sub-main drop to just 2.14% (4.93V).
✔ Compliant Cable: 10.0 mm² 2C+E Copper (or Orange Circular) protected by a 32A Type C MCB in the main switchboard, feeding an 8-pole shed sub-board.
Example C: High-Demand Studio Shed with Split System & Car Hoist
Calculation Check: 10mm² copper has an ampacity of ~54A in conduit, but over 45m at 50A load, voltage drop equals (45 × 50 × 4.40) / 1000 = 9.9V = 4.3%, which leaves zero margin for the shed's final circuits. 16mm² copper (Vc = 2.76) brings drop down to (45 × 50 × 2.76) / 1000 = 6.21V = 2.7%.
✔ Compliant Cable: 16.0 mm² 2C+E Copper protected by a 50A MCB, or 3-phase 10mm² if 415V supply is available at the property.
Common Mistakes When Running Power to a Shed
Electrical inspectors routinely flag these five avoidable mistakes on Aussie outbuilding installations:
- 1. Forgetting Voltage Drop: Picking 4mm² because "it carries 30A", forgetting that over 40 metres, voltage drop chokes motor starting torque and overheats tool windings.
- 2. Direct-Burying Standard White TPS: Flat white domestic cable is not rated for direct burial. Ground moisture breaks down the sheath, causing nuisance RCD trips within months.
- 3. Shallow Trenches & Missing Marker Tape: Digging just 250mm deep to dodge tree roots. AS/NZS 3000 Table 3.7 mandates 500mm depth in unpaved ground with orange warning tape at half depth.
- 4. Piggybacking Off a House Power Point: Spurring off an existing bedroom circuit instead of running a dedicated sub-main. When the workshop compressor fires up, the house circuit trips.
- 5. Zero Spare Capacity: Running a tight 2.5mm² wire for a single light. Wanting a split system air conditioner or EV charger two years later means digging up the lawn all over again.
What to Check Before Running the Cable
Work through this quick on-site tradie checklist before breaking ground:
☑ Pre-Trenching & Installation Checklist
- ✓ Lodge a BYDA Enquiry (1100): Locate underground gas, water mains, and comms lines before digging.
- ✓ Check Main Switchboard Poles: Confirm at least two spare DIN-rail spaces and adequate main service fuse capacity.
- ✓ Upsize Conduit to 25mm or 32mm: Pulling 10mm² or 16mm² sub-mains through tight 20mm conduit elbows is a nightmare.
- ✓ Leave a Draw Wire: Pull an extra nylon cord through the conduit for future data cabling or solar monitoring.
- ✓ Photograph Depths Before Backfilling: Take timestamped photos with a tape measure showing 500mm depth and orange tape for your certifier.
Powering a backyard shed is a huge value-add, but cutting corners on cable gauge or trench compliance will only cost double to fix later. Always calculate voltage drop over your true distance and leave spare capacity for future tools.
Have a licensed Australian electrical contractor verify your maximum demand, pull the final terminations, test fault loop impedance, and sign off your Certificate of Electrical Safety (COES).